前言
各行各业都在往自动化靠拢, 我也要来蹭一波自动化.
🚩那就让我们开始吧
生成Key
如果你的 Hexo 可以正常地部署到 GitHub,那么实际上你原来的秘钥是可以正常使用的。
但是我的私钥还用于不同的服务器的 SSH 访问和其他身份验证,因此,我们生成一个新的秘钥对来专门部署 Hexo。
然后, 打开运行 Win + R, 输入 cmd, 运行上述命令👆
这会在当前目录生成两个文件:
1
2
| github-deploy-key —— 私钥
github-deploy-key.pub —— 公钥
|
GitHub 配置ENV
当前环境为: Github Action运行环境
网页地址: HEXO博客源码仓库/settings/secrets/actions
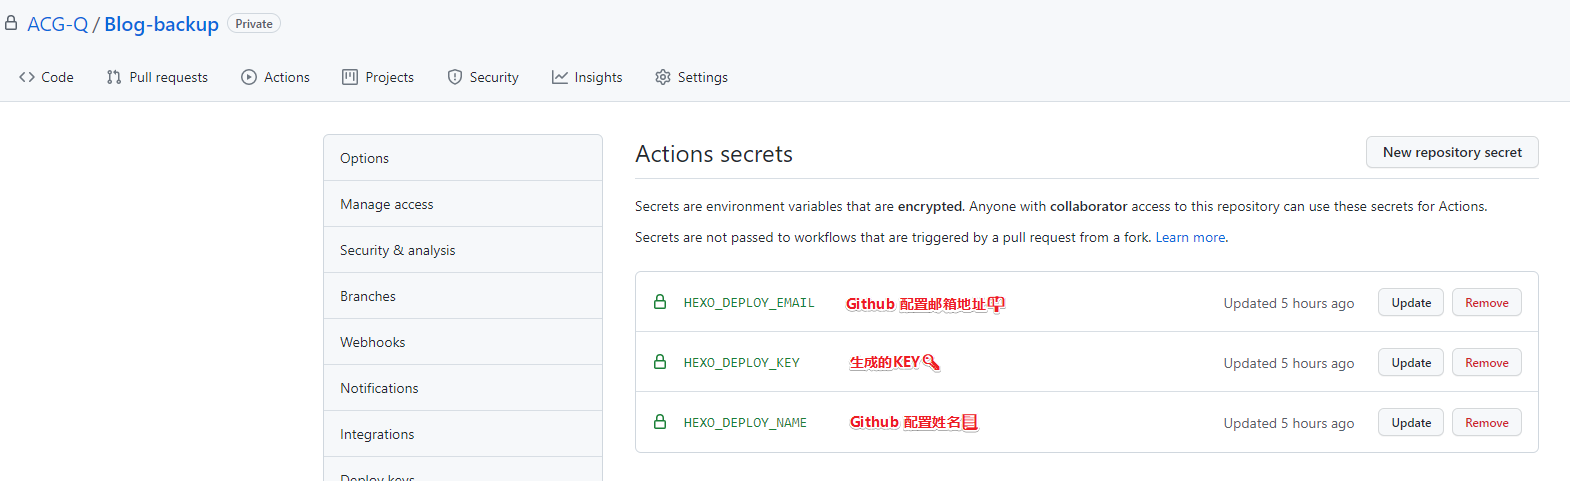
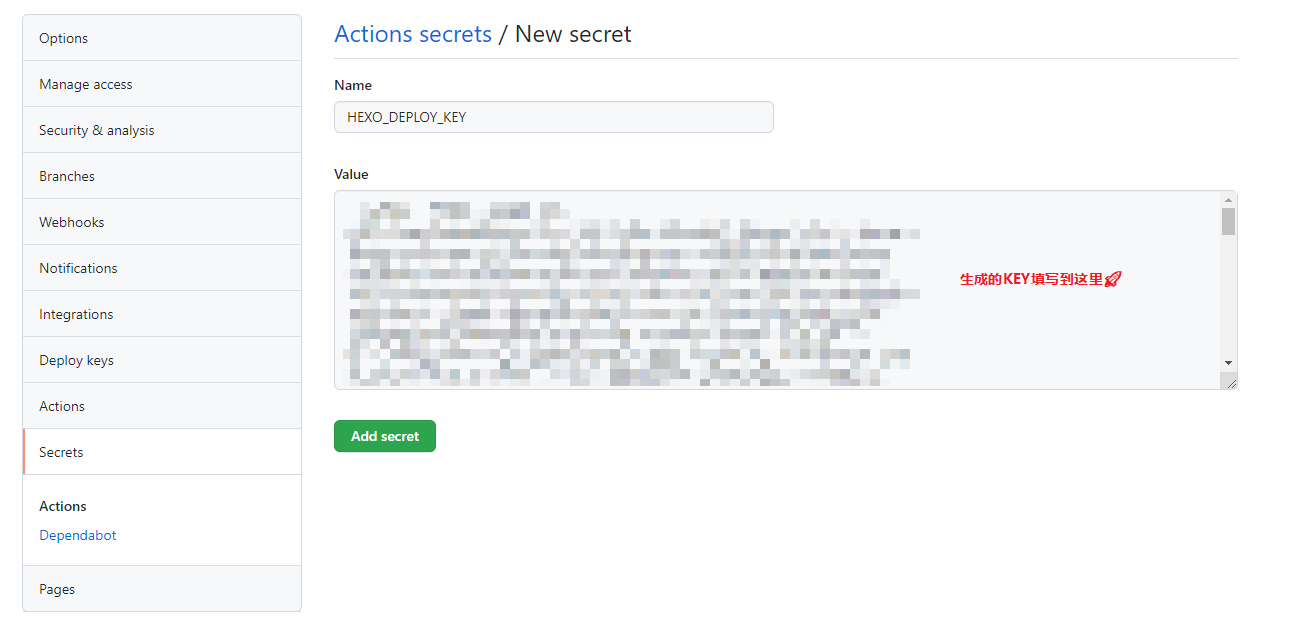
Github Env: HEXO_DEPLOY_KEY
生成KEY🔑
将 github-deploy-key文件的内容填写到 Actions secrets的 HEXO_DEPLOY_KEY的value值
Github Env: HEXO_DEPLOY_EMAIL \ HEXO_DEPLOY_NAME
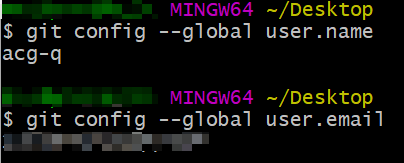
如果本地上就可以正常运行Git程序, 那么这里就可以填写本地上的配置信息
配置完成后, 就可以进行下一步了🚀
GitHub 配置公钥
当前地址为: Hexo博客仓库(xxxx.github.io)
例如: 我的Hexo博客仓库就在https://github.com/ACG-Q/acg-q.github.io
网页地址: 仓库地址/settings/keys
例如: https://github.com/ACG-Q/acg-q.github.io/settings/keys
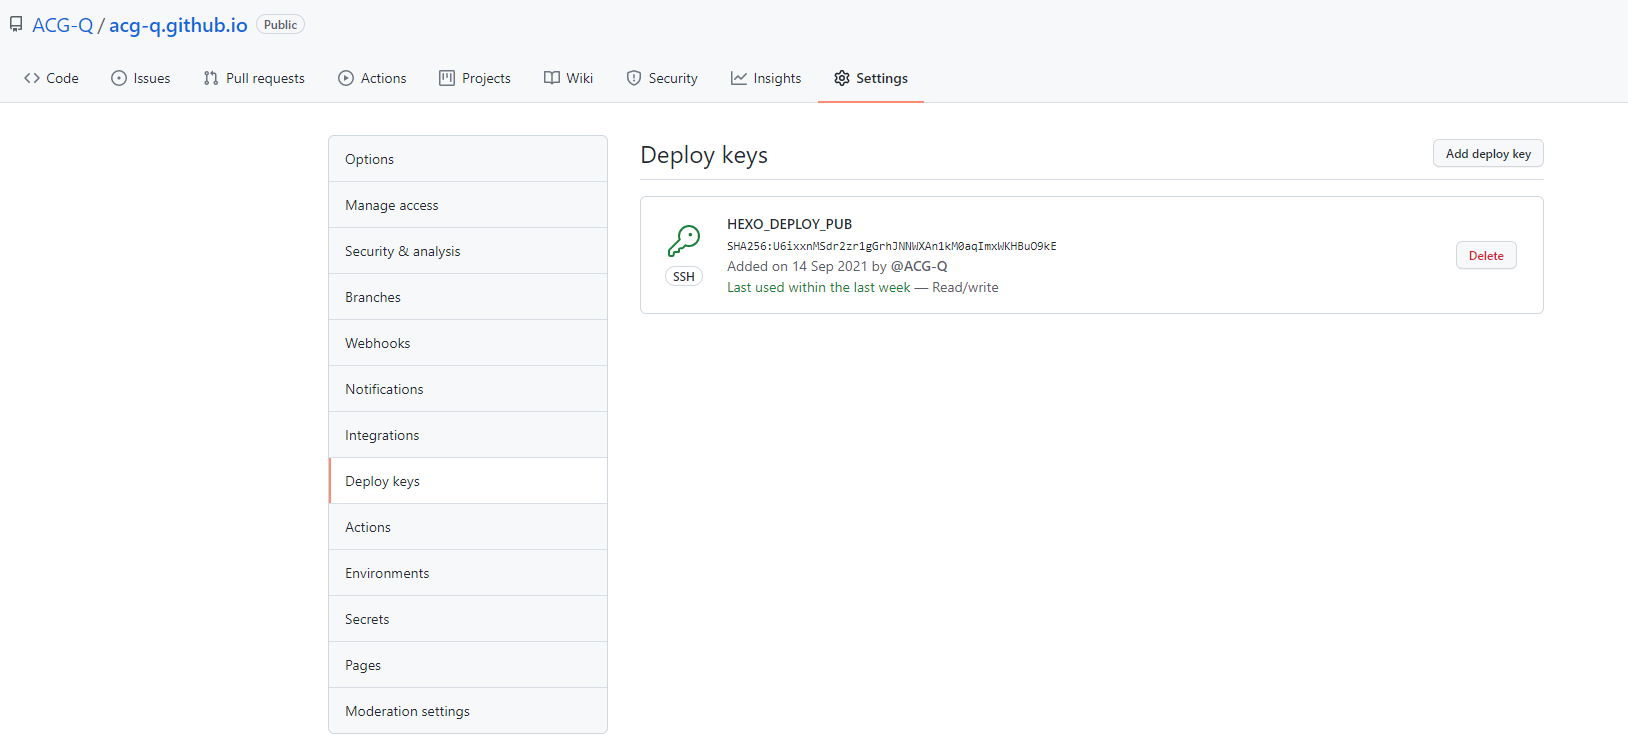
将 github-deploy-key.pub文件的内容填写到 Deploy keys的 HEXO_DEPLOY_PUB的value值

创建工作流
通过模板生成
选择任意模板, 即可, 这里点击 Gulp模板的 Set up this workflow按钮

修改工作流配置文件
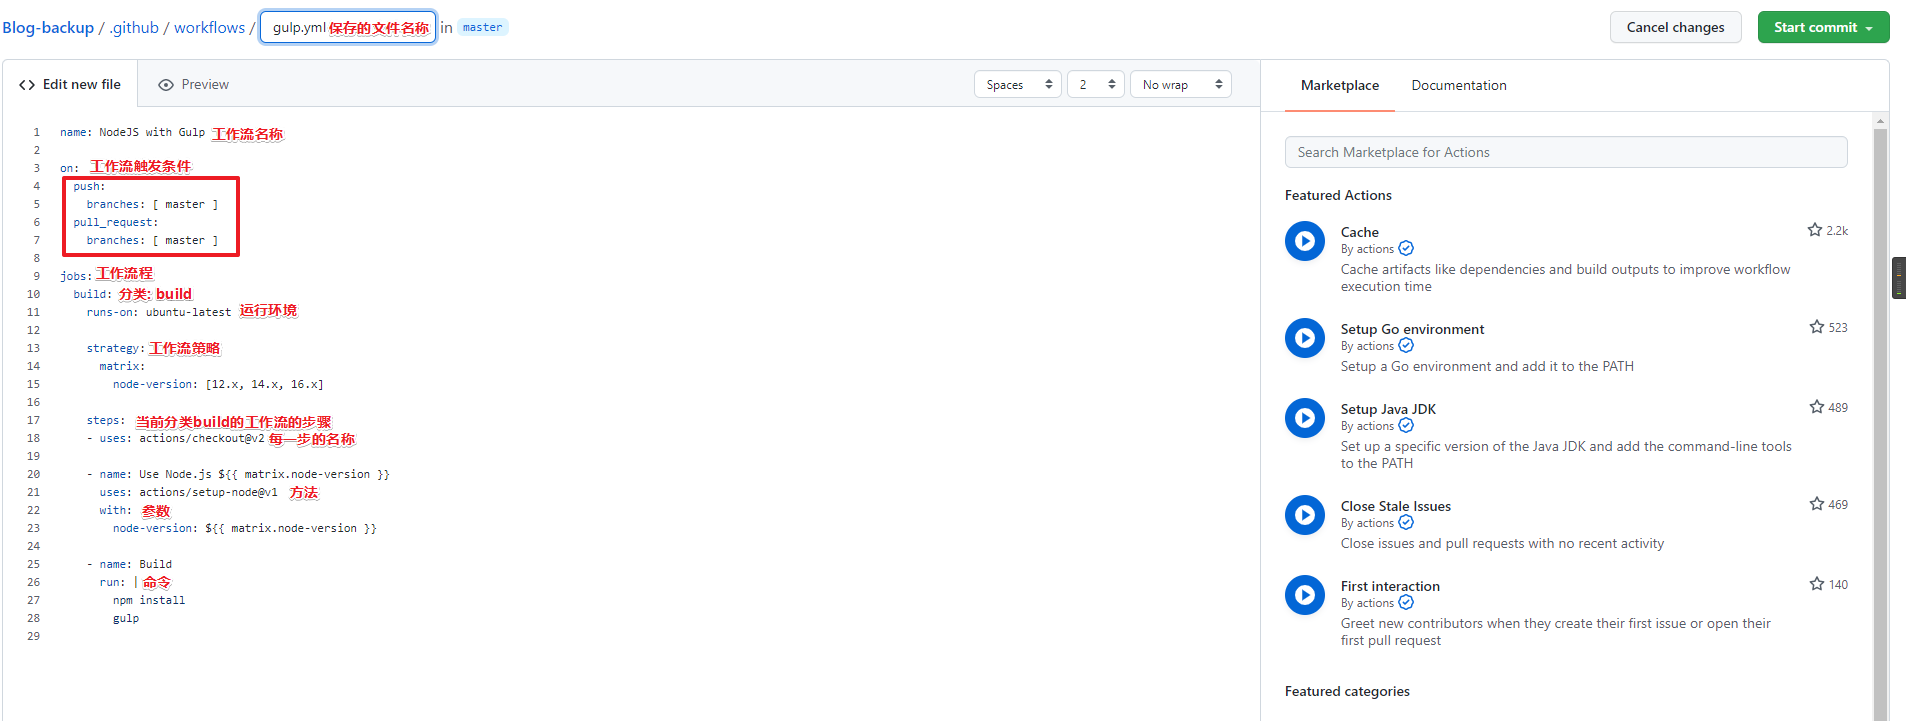
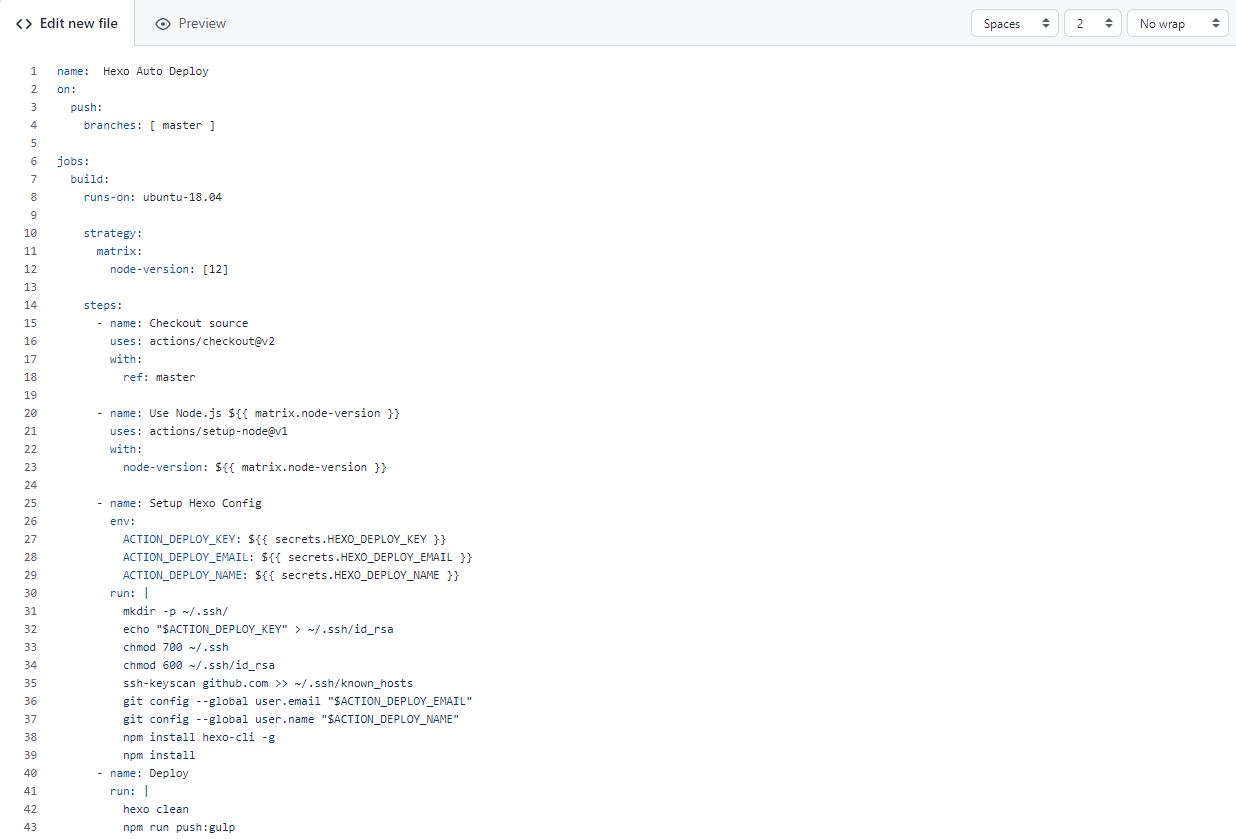
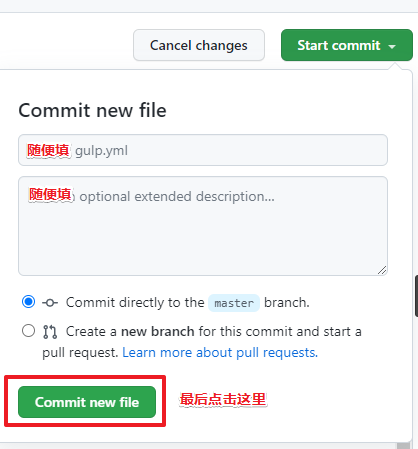
然后就是点击 Start commit按钮, 根据提示进行填写, 最后点击 Commit new file按钮
自行创建(脚本更新于 2024年1月10日)
创建 HEXO博客源码仓库/.github/workflows/auto-deploy.yml
1
2
3
4
5
6
7
8
9
10
11
12
13
14
15
16
17
18
19
20
21
22
23
24
25
26
27
28
29
30
31
32
33
34
35
36
37
38
39
40
41
42
43
44
45
46
47
48
49
50
51
52
53
54
55
56
57
58
59
60
61
62
63
64
| name: Hexo Auto Deploy
on:
push:
branches:
- main
jobs:
build:
runs-on: ubuntu-latest
strategy:
matrix:
node-version: [16.x]
steps:
- name: 开始运行
uses: actions/checkout@v1
- name: 设置 Node.js ${{ matrix.node-version }}
uses: actions/setup-node@v1
with:
node-version: ${{ matrix.node-version }}
- name: 安裝 Hexo CI
run: |
npm install hexo-cli -g
- name: 缓存node_modules
uses: actions/cache@v1
id: cache-dependencies
with:
path: node_modules
key: ${{runner.OS}}-${{hashFiles('**/package.json')}}
- name: 安装环境
if: steps.cache-dependencies.outputs.cache-hit != 'true'
run: |
npm install
- name: 完成 Git 配置
env:
ACTION_DEPLOY_KEY: ${{ secrets.HEXO_DEPLOY_KEY }}
ACTION_DEPLOY_EMAIL: ${{ secrets.HEXO_DEPLOY_EMAIL }}
ACTION_DEPLOY_NAME: ${{ secrets.HEXO_DEPLOY_NAME }}
run: |
mkdir -p ~/.ssh/
echo "$ACTION_DEPLOY_KEY" > ~/.ssh/id_rsa
chmod 700 ~/.ssh
chmod 600 ~/.ssh/id_rsa
ssh-keyscan github.com >> ~/.ssh/known_hosts
git config --global user.email "$ACTION_DEPLOY_EMAIL"
git config --global user.name "$ACTION_DEPLOY_NAME"
- name: 部署博客 && 复制一些额外的文件
env:
ACTION_DEPLOY_EMAIL: ${{ secrets.HEXO_DEPLOY_EMAIL }}
ACTION_DEPLOY_NAME: ${{ secrets.HEXO_DEPLOY_NAME }}
run: |
export TZ="Asia/Shanghai"
hexo clean && hexo g
cd ./public
cp ../.initialize/public/.github ./ -rf
cd ../
hexo deploy
|
工作流运行逻辑: 当我们推送内容到远程 master分支的时候,就会触发这个 Workflow
最后, 测试一波✨

当然, 后面可以将 jobs.build.strategy.matrix.node-version的三个版本修改成一个版本
后续
Gitalk全自动初始化
- Gitalk 经过测试, Get✔
- Gitment 理论上可行
- 在根目录(HEXO源码)下添加文件夹
.initialize
- 进入文件夹初始化Node项目(运行下述命令)
小白版: 一路回车即可, 啥都不用管
大神版: 懂得都懂 
- 在文件夹中创建文件
gitalkInitialize.js
- 填写NodeJs脚本
这个脚本来源于互联网, 作者未知📍, 已失效.
经过我的修复, 已经可行了
需要自行修改项:
- config - Github 配置信息, 例如: GitHub 用户名、GitHub Token等等
- directory - 需要的初始化的网页, 例如: ‘/abbrlink/‘、’/list/‘
1
2
3
4
5
6
7
8
9
10
11
12
13
14
15
16
17
18
19
20
21
22
23
24
25
26
27
28
29
30
31
32
33
34
35
36
37
38
39
40
41
42
43
44
45
46
47
48
49
50
51
52
53
54
55
56
57
58
59
60
61
62
63
64
65
66
67
68
69
70
71
72
73
74
75
76
77
78
79
80
81
82
83
84
85
86
87
88
89
90
91
92
93
94
95
96
97
98
99
100
101
102
103
104
105
106
107
108
109
110
111
112
113
114
115
116
117
118
119
120
121
122
123
124
125
126
127
128
129
130
131
132
133
134
135
136
137
138
139
140
141
142
143
| const request = require("request");
const fs = require("fs");
const path = require("path");
const url = require("url");
const xmlParser = require("xml-parser");
const cheerio = require("cheerio");
var crypto = require('crypto');
const config = {
username: "<Github UserName>",
token: "<GitHub Token>",
repo: "<GitHub Comment>",
sitemapUrl: path.resolve(__dirname, "../public/sitemap.xml"),
kind: "Gitalk",
};
let issuesUrl = `https://api.github.com/repos/${config.username}/${config.repo}/issues?`;
let requestGetOpt = {
url: `${issuesUrl}page=1&per_page=1000`,
json: true,
headers: {
Authorization: `token ${config.token}`,
'User-Agent': 'Mozilla/5.0 (Windows NT 10.0; Win64; x64) AppleWebKit/537.36 (KHTML, like Gecko) Chrome/67.0.3396.99 Safari/537.36',
'Accept': 'application/json',
'Content-Type': 'application/json;charset=UTF-8'
},
};
let requestPostOpt = {
...requestGetOpt,
url: issuesUrl,
method: "POST",
form: "",
};
console.log("开始初始化评论...");
(async function () {
console.log("开始检索链接,请稍等...");
try {
let urls = sitemapXmlReader(config.sitemapUrl);
let directory = ["/abbrlink/", "/list/", "/gallery/"];
urls = inArray(urls, directory);
console.log(`共检索到${urls.length}个链接`);
console.log("开始获取已经初始化的issues:");
let issues = await send(requestGetOpt);
console.log(`已经存在${issues.length}个issues`);
let notInitIssueLinks = urls.filter((link) => {
return !issues.find((item) => {
link = removeProtocol(link);
return item.body.includes(link);
});
});
if (notInitIssueLinks.length > 0) {
console.log(
`本次有${notInitIssueLinks.length}个链接需要初始化issue:`
);
console.log(notInitIssueLinks);
console.log("开始提交初始化请求, 大约需要40秒...");
setTimeout(async () => {
let initRet = await notInitIssueLinks.map((item) => {
send({ ...requestGetOpt, url: item }).then(data => {
let $ = cheerio.load(data);
let title = $('title').text();
let content = $("meta[name='description']").attr("content")
let body = content ? item + "\n\n" + content : item;
let pathLabel = url.parse(item).path;
var md5 = crypto.createHash('md5');
var label = md5.update(pathLabel).digest('hex')
let form = JSON.stringify({
labels: [config.kind, label],
title: title,
body: body
});
return send({ ...requestPostOpt, form })
.then(data=>{
console.log("地址: ["+pathLabel+"] Gitalk初始化成功")
})
.catch(err=>{
console.log("地址: ["+pathLabel+"] Gitalk初始化失败")
});
}).catch(err=>{
console.log("地址: "+item+", 获取失败, 错误原因:")
console.log(err)
});
});
console.log(`已完成${initRet.length}个!`);
console.log("可以愉快的发表评论了!");
}, 40000);
} else {
console.log("本次发布无新增页面,无需初始化issue!!");
}
} catch (e) {
console.log(`初始化issue出错,错误如下:`);
console.log(e);
} finally {
}
})();
function inArray(arr, arr2) {
var array3 = [];
for (var i = 0; i < arr.length; i++) {
for (var j = 0; j < arr2.length; j++) {
var item = arr2[j];
if (arr[i].indexOf(item) != -1) {
array3.push(arr[i]);
}
}
}
return array3;
}
function sitemapXmlReader(file) {
let data = fs.readFileSync(file, "utf8");
let sitemap = xmlParser(data);
return sitemap.root.children.map(function (url) {
let loc = url.children.filter(function (item) {
return item.name === "loc";
})[0];
return loc.content;
});
}
function removeProtocol(url) {
return url.substr(url.indexOf(":"));
}
function send(options) {
return new Promise(function (resolve, reject) {
request(options, function (error, response, body) {
if (!error) {
resolve(body);
} else {
reject(error);
}
});
});
}
|
label标签除了评论标签(“Gitalk” or “Gitment”), 还有网页路径唯一标签(我这里是网页路径MD5加密作为唯一标签, 如果你的是其他加密或者就是网页路径作为唯一标签, 那就自行修改)
- 添加Node插件
1
| npm install --save cheerio request xml-parser
|
- 在自动化工作流中添加
1
2
3
4
5
| - name: Deploy
run: |
+ cd .initialize
+ npm install
+ npm run init
|
参考资料
前有自动签到项目(大部分都GG了), 后有云编译程序, 可参考学习的资料太多了.
最重要的是Github会根据你项目的语言来提供可能的Github Action模板, 写起来非常方便.